Bookbinder
The bookbinder class is able to create books and other types of stationery.
Basic Commands
Bookbinders are able to craft items from paper, fabric, metal, and wood. Not all items can be made from all materials.
The standard crafting command syntax is: [verb] [material] into [item]
The crafting verb for reams of paper is cut. You will need a ream of paper and scissors.
Ex: cut ream into book
The crafting verb for rolls and bolts of fabric is tailor. You will need a roll/bolt of fabric, a pair of scissors, and a sewing needle.
Ex: tailor fabric into book
The crafting verb for rods of metal is forge. You will need a rod of metal, a hammer, and an anvil.
Ex: forge rod into book
The crafting verb for lumber is carve. You will need lumber and a carving knife.
Ex: carve lumber into book
Some tools, such as the anvil, are available in public spaces for general use. Since you cannot pick them up, you will need to target the tool(s) in addition to the base command.
Ex: forge rod into book with anvil (this syntax assumes that you are holding a hammer)
You can see a full list of items available to you at your skill level in the @craft menu. Items are divided by command. For example, carved (wood) items:

Level: This is the minimum skill level necessary to craft the item.
Command: This is the command you will put in the [verb] slot to create the item.
Resource: This is the material you will need to create the item.
Unit Cost: This is how much material you will need to create the item. To see how much material you have left, examine the material (ex: examine ream).
You can also see a full list which items you can craft from a given material by omitting the into [item] portion of the command.
Ex: cut ream
Valid options are: “album” “book” “bookmark” “broadsheet” “card” “envelope” “folder”
Note: The list of options will vary based on skill level and material. The list may be empty if your skill level is not high enough.
Some of the paper stationery items can be cut a second time into different shapes. The command syntax is the same. As with the original items, you can see a list of the shape options by omitting the into [item] portion of the command. Likewise, the available options will vary by skill level or may be empty.
Ex: cut bookmark
Valid options are: “bell-shaped” “circular” “clover-shaped” “crescent-shaped”
Ex: cut bookmark into heart-shaped
You cut your your white parchment bookmark into a heart-shaped white parchment bookmark.
Note: The final quality of the item is based on your skill level and the quality of the original material used. Because the skill level aspect of this calculation is handled with a (virtual) die roll, there may be some variation in the final quality even when crafting from the same material.
Advanced Commands
Dyeing Materials
The color of reams of paper and bolts/rolls of fabric can be changed using the standard dyes available. The command to apply dye to a material is add.
Ex: add dye to ream
Each dye application will take one use from the dye pot regardless of the quantity left in the ream or on the bolt/roll, i.e. a full ream uses the same amount of dye as a ream with only one sheet remaining. All items crafted from the dyed ream, bolt, or roll will have the same color as the dyed material. You can dye over the material with a new dye to change the color again (this will not affect items crafted from the material prior to the new dye application).
Maker’s Marks
Bookbinders can put a maker’s mark on their items using the brand command.
Ex: brand book
A maker’s mark, if present on an item, can be seen when the item is examined. The maker’s mark can be seen when you examine the item.
You examine your white parchment book.
A sixteen page white parchment book.
– A small maker’s mark indicates that this item was crafted by Kjell.
The white parchment book appears to be of exceptional quality.
Embossing & Engraving
Many of the bookbinder items can be embossed or engraved. You will gain access to more embossing and engraving options at each level.
The standard embossing/engraving command syntax is: [verb] [item] ‘[pattern]
The command for items crafted from paper, fabric, and metal is emboss. You will need an embossing stylus.
Ex: emboss book ‘rose
The command for items crafted from wood is engrave. You will need a carving knife.
Ex: engrave book ‘rose
To see a list of embossing/engraving options available for an item, omit the ‘[pattern] portion of the command.
Ex: engrave book
Engrave Kjell’s white alder book ‘PATTERN
Your pattern options are: arabesque, autumn leaf, lily, mountain, rose, seashell
You can also do a custom engraving using the syntax: engrave my item ‘custom’.
As noted at the bottom of the options list, you can create custom embossings and engravings by putting custom for the [pattern].
Ex: engrave book ‘custom
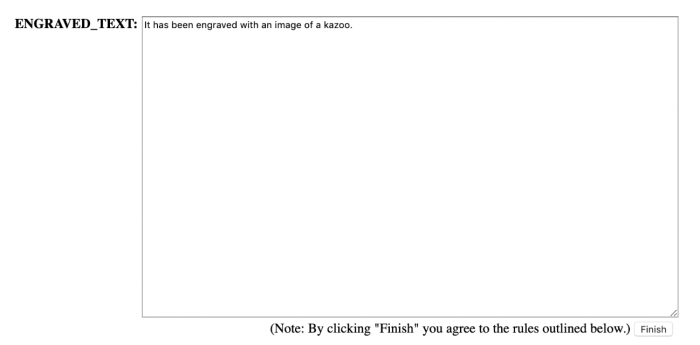
A separate pop-up window will appear for custom embossings and engravings (check your browser’s pop-up settings if this does not happen). The length of the custom embossing or engraving is determined by your skill level, i.e. bookbinders with a higher skill level can write longer custom embossings and engravings.

Enter your embossing or engraving into the text box and click the Finish button below.
The formatting for embossings and engravings is entirely freeform, and the full sentence will appear as written after the base description of the item.
Ex:
You look at your engraved alder book.
A sixteen page alder book. It has been engraved with an image of a kazoo.
Check your custom submission for errors and be mindful of the period at the end before clicking the Finish button. Once an item has been embossed or engraved, you will not be able to make any changes to the embossing or engraving.
Please note that there are rules associated with custom submissions across all crafts:
- Submissions can have magical/supernatural themes but cannot be magical/supernatural themselves (ie. a painting of a figure that moves around the canvas).
- Vulgar/sexually explicit material is forbidden–if the content is not acceptable for a minor, do not submit it! When in doubt, contact staff.
- Avoid phrasing that forces the viewer to think or feel a certain way (ie ‘this painting is so beautiful you can’t help but cry’).
- Do not reference details of the canvas that do not actually exist, such as a frame.
- I understand if I violate these rules, access to this command will be revoked.
If you are unsure about whether or not your custom submission will be in violation of these rules, @assist first. Staff reserves the right to edit or delete items in violation of one or more rules.
